-
Contact lensesDaily Fortnightly Monthly Toric Multifocal
Acuvue Dailies Biofinity OPSM View all brands
Solutions & Accessories Subscribe & Save 25% View all
contacts
View all
contacts

*Prices as marked. Exclusions and T&Cs apply.
-
Glasses
New ArrivalsBest SellersNewRay-Ban | MetaNewOakley | MetaTransitions®New
Frame + Lenses From $149* Sale | Up to 50% off
Transitions®
Ray-Ban Oakley Miu Miu Versace
 Find your Frame
VIEW ALL GLASSES
Find your Frame
VIEW ALL GLASSES

*Prices as marked. Exclusions and T&Cs apply.
-
Sunglasses
New ArrivalsBest SellersNewRay-Ban | MetaNewOakley | MetaNew
Sale | Up to 50% off
Oakley® Prizm™ Lenses
Ray-Ban Oakley Prada Ralph
Find your Frame
VIEW ALL SUNGLASSES

*Prices as marked. Exclusions and T&Cs apply.
-
Brands
Our favourite brands


a - z
Alain Mikli Armani Exchange ArnetteBolonBurberry Celine Coach Costa Dior Dolce&Gabbana Emporio Armani Giorgio Armani Gucci Jimmy Choo Michael Kors Miu Miu Moncler Nuance Audio OakleyNewOakley MetaOliver PeoplesNewOrotonPersol Polo Ralph Lauren Prada Prada Linea Rossa Ralph Ray-BanNewRay-Ban MetaScuderia Ferrari Sferoflex Swarovski Tiffany & Co. Tom Ford Versace Vogue EyewearNew


 Book an eye test
 Health Funds
 Find A Store
 Favourites


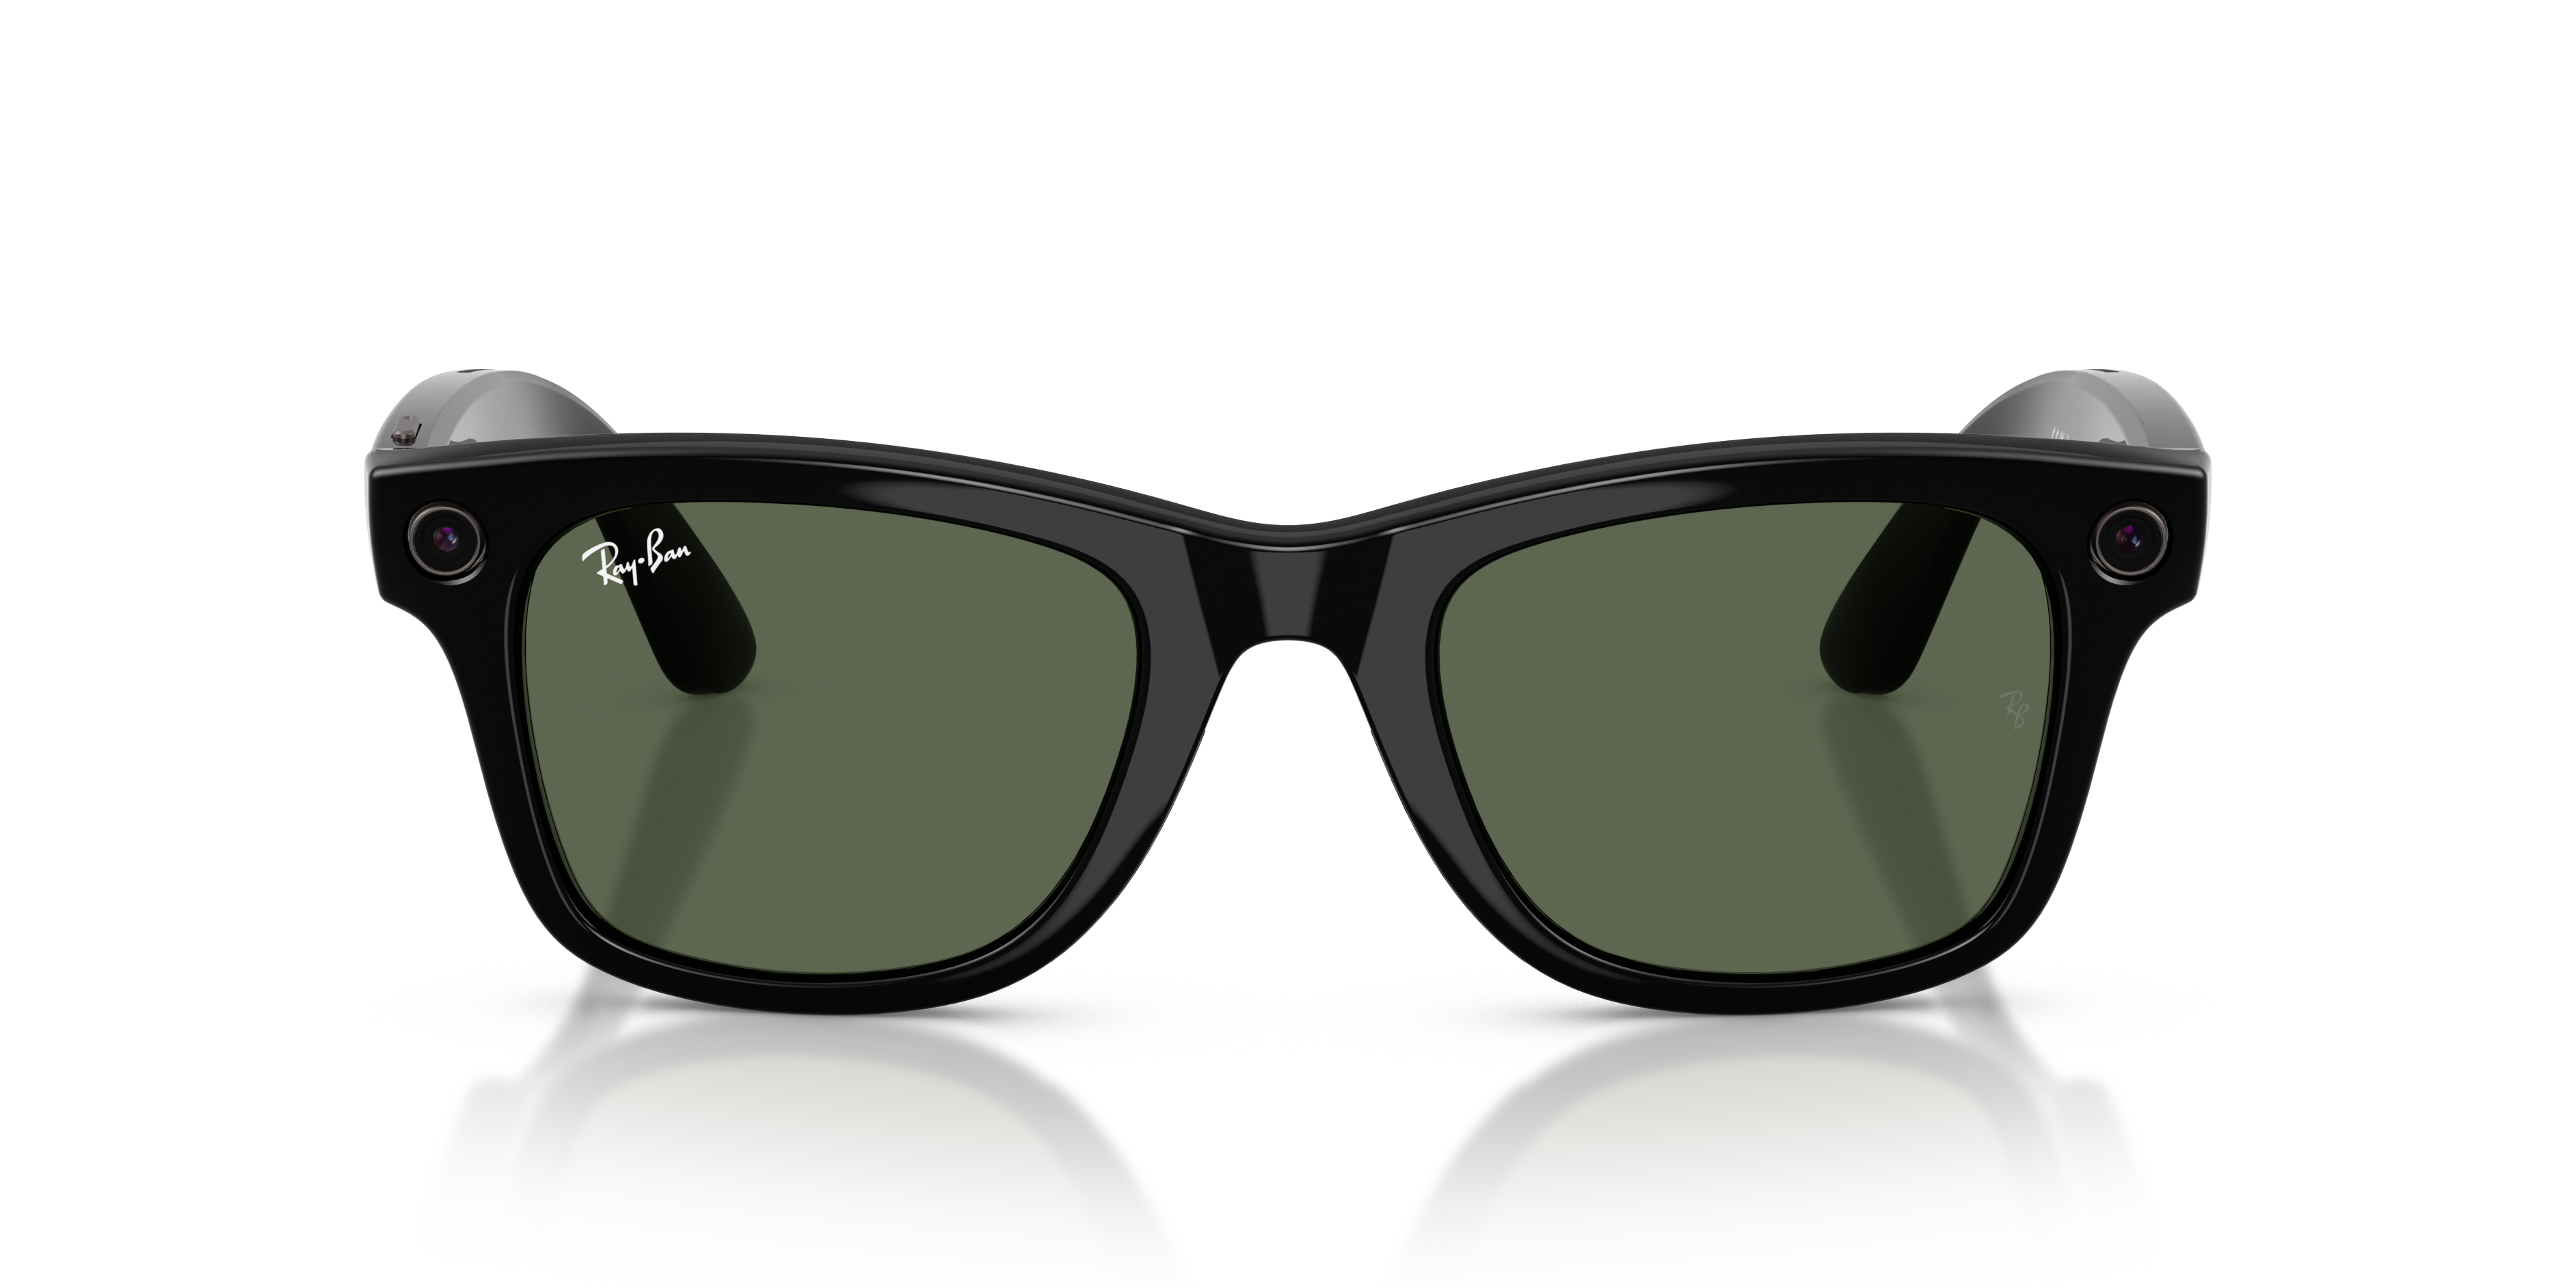


RAY-BAN META GLASSES
RAY-BAN META
Ray-Ban Meta Glasses are clearly identified on the frame and case. You can check out the following features on every pair:
- • Product name shown on the inner right temple
- • Meta logo shown on the right temple hinge
- • Special charging case with Ray-Ban | Meta logo printed on the inside
You can buy Ray-Ban Meta Glasses on Ray-Ban.com, at official Ray-Ban stores and from certified Ray-Ban dealers (online & in store). Currently they're available for purchase in the United States, Canada, United Kingdom, Ireland, Austria, Belgium, France, Italy, Spain, Germany, Finland, Norway, Denmark, Sweden and Australia. They are also available in select markets via the Meta website.
We offer Standard shipping to all of our stores. The shipping methods available for your address will be visible at checkout.
You can view and download the Ray-Ban Meta Glasses manufacturer warranty policy here.
Returns are rare for Ray-Ban Meta Glasses, but if you think your Ray-Ban Meta Glasses are defective and the return timeframe has expired you can contact us for a repair or replacement. When contacting us please provide your product serial number and proof of purchase. The warranty is valid for 2 years from purchase.
We’re sorry that something didn’t work out with your glasses.
There are two ways to return your Ray-Ban Meta Glasses Collection.
Mail
To return your Ray-Ban Meta Glasses Collection by mail please complete the following steps:
- - Contact Customer Care who will assess the status of the glasses and arrange the return for you.
- - Import all of your captures to your phone or the Meta View app.
- - Factory reset the glasses to remove your personal data and delete your captures.
- - Turn off the glasses.
- - Prepare your return with the box that your glasses arrived in. In addition to the glasses please add all of the accessories, including the charging case. If the box is no longer available or in a suitable condition, please ask Customer Care for a return kit and we’ll mail you everything you need to complete the return.
In store
To return your Ray-Ban Meta Glasses Collection in store please complete the following steps:
- - Import all of your captures to your phone or the Meta View app.
- - Factory reset the glasses to remove your personal data and delete your captures.
- - Turn off the glasses.
- - Prepare your return with the box that your glasses arrived in. In addition to the glasses please add all of the accessories, including the charging case. If the box is no longer available or in a suitable condition, a member of the store will take care of it directly.
- - Take the glasses to your nearest OPSM store and a member of the store team will take care of the return shipment for you. You can use the store locator to find the store closest to you.
Items purchased on opsm.com.au can be returned exclusively to OPSM stores. It's not possible to return an online purchase to a Ray-Ban store or another certified dealer.
To operate Ray-Ban Meta Glasses you need to connect your glasses with a smart phone and the Meta View app. Here’s the complete checklist:
- - Smart phone with a recently released operating system: Android 10 and above (with location services enabled) or iOS 14.4 and above.
- - Wireless internet access
- - USB-C charging plug (if charging from a power outlet and not directly from a USB point)
- - A valid Meta account
- - Meta View app (downloadable from your App store here or by scanning this QR code)

Your Ray-Ban Meta Glasses come with the following accessories and user manuals:
- - Charging case
- - Quick Start Guide
- - Safety & Warranty Guide (also downloadable here)
- - Instructions for ordering Prescription lenses
- - Cleaning cloth
You can download the Ray-Ban Meta Glasses collection companion app, Meta View, from the Apple App or Google Play stores.
Please note: The app is only available to download in supported countries.WHEN YOU FIRST UNBOX YOUR RAY-BAN META GLASSES:
- 1. Remove the plastic tab between the case and the glasses
- 2. Make sure your glasses are redocked inside the case
- 3. Wait until the LED light starts flashing blue
- 4. Your device is now ready to pair
MANUALLY:
- 1. Place your glasses inside the case
- 2. Press and hold the button on the back of the case for at least 5 seconds
- 3. Wait until the LED light starts flashing blue
- 4. Your device is now ready to pair
- 1. Download the Meta View app from your app store and log in using your Meta account.
- 2. Turn on the Bluetooth setting on your phone.
- 3a. Start by turning on your glasses. Slide and hold the power switch towards the lens until the notification LED starts blinking white, then release it. The notification LED blinks white while your glasses turn on, which can take up to a minute. When the notification LED turns solid green, you're ready to continue. (If you can’t complete this step, continue to 3b, otherwise move on to step 4).
- 3b. Your glasses need to be fully charged before pairing. If you need to charge your glasses, place them inside the charging case and connect the case to a power source before moving on to step 4.
- 4. Put your glasses into Bluetooth pairing mode. Fold both arms and hold capture button on top of the frames down for 12 secs until LED on the inside of the frames starts blinking blue. Your glasses will appear in the app when they're in pairing mode, which can take up to 10 seconds.
- 5. Continue following the instructions in the Meta View app to finish setting up your glasses.
- 6. Enjoy exploring your world in a new way with the Ray-Ban Meta Glasses collection.
Your glasses use Wi-Fi in two different ways:
- - For normal use, the app connects to your Wi-Fi network.
- - When importing captures or installing firmware updates, the app will connect directly to your glasses' temporary Wi-Fi network.
Ray-Ban Meta Glasses are IPX4 water resistant. IPX4 rating means your glasses are safe even if you get caught in light rain while wearing them. Simply remove the glasses as soon as you can, wipe them completely dry and you're good to go.
The Product is not designed to resist submersion or extended exposure to water or other liquids. In case of water exposure, dry the Product thoroughly and clear the charging areas of residue or other debris.
You'll find complete care, safety and use instructions in the Safety and Warranty Guide that came with your glasses. You can also download them here.
You can find your Ray-Ban Meta Glasses collection serial number in two places:
- 1. In the Meta View app under: Settings - Select your glasses - Glasses & privacy - Your glasses - About your glasses
- 2. Printed on the inside of the left temple of your glasses
How do I switch the Meta account associated with my Ray-Ban Meta Glasses? / Can someone else use my Ray-Ban Meta Glasses after me?
Ray-Ban Meta Glasses can only pair with one Meta account at a time. If you want to sell or give your glasses to someone else, you'll need to complete a factory reset. You can do this yourself, or alternatively the person receiving the glasses will be prompted to complete a factory reset when they attempt to log in with their account.
When Ray-Ban Meta Glasses go through a factory reset, it permanently erases all captures and any associations between the glasses and your Meta Account.
To factory reset, take the following steps:
- 1. Make sure the glasses are fully powered on and not in use
- 2. Slide and hold the power switch all the way to the right, while you press and hold the capture button
- 3. When the notification LED turns solid orange, first release the capture button followed by the power switch
- 4. Factory reset is complete when the notification LED turns off
Ray-Ban Meta Glasses can only pair with one valid Meta account at a time. You'll need to factory reset your glasses before someone else can use them.
You can rewatch the Product Tour to get to know your glasses by following these steps:
- 1. From the Meta View app, tap on Settings - Select your glasses - Glasses & privacy - Your glasses - About your glasses - Product tour
You need a Meta account to log in to the Meta View App. Both new and existing users have the option to create a new Meta account, or log in with an existing one. You can create a new account using email, Facebook or Instagram logins. When setting up an account, you'll be asked to provide basic information such as name, birthday and email address.
If I’m an existing user and switched to a Meta account, how long do I have to import my photos and videos from my glasses to the View app?
As an existing user switching to a Meta account in the Meta View app, you have 60 days to pair your glasses to complete the migration. If migration is not completed within 60 days, you'll need to do a factory reset (which will result in a loss of any photos or videos stored on the glasses and not yet imported to the app).
Where can I find more information on privacy and data related to the Ray-Ban Meta Glasses collection and Meta View app?
Additional privacy or data information is provided in the Meta View Help Center.
You'll find health & safety information relating to the Ray-Ban Meta Glasses in your glasses Safety & Warranty document, which you can download here.
To clean your glasses, use a dampened cloth and mild soap, avoiding all types of solvents or alcohol. Don't use dirty or abrasive cloths which could alter the features of the lenses. Don't hold your glasses under running water. Gently clean the lenses, camera lens, and the nose bridge charging contacts. Dry off the glasses before putting them back inside the charging case or wearing them.
No, it's not possible to replace the embedded battery inside the glasses or charging case. If your AI glasses aren't charging please refer to FAQ What Should I Do If My Glasses Won't Turn On?
No, Ray-Ban Meta Glasses don't have a "Find my glasses" feature.
Please download the attached document which explains how to read these markings here
We’re sorry that you haven’t found the answer you’re looking for. You can find further information and contact details for our customer care via the Ray-Ban Help Center. You can also visit the Meta Help Center for more information on the Meta View app.
In the course of our lives, each of us throws away significant amounts of electrical and electronic equipment. We need to protect the environment by adopting sustainability criteria.
Our products may contain hazardous materials which, if not disposed of properly, can have a negative impact on health and the environment. We're committed to the safe recovery of waste electrical and electronic equipment.
Ray-Ban Meta Glasses are prescription lens compatible. You can get Ray-Ban Meta Glasses with prescription lenses by ordering a complete pair directly from Ray-Ban.com.
You can also get prescription lenses added to your Ray-Ban Meta Glasses at your optomestrist or preferred optical provider, but the manufacturer warranty will only remain intact if you get prescription lenses added at a certified retailer listed here.
Yes, replacement cases are available for purchase. In order to proceed with the purchase, you can contact us and our team will be happy to provide you with the assistance you need. Replacements are currently limited to one case per order.
When turned on, your media will be processed on the cloud to get higher quality photos, videos, montages, and curated suggestions that allow you to quickly pick your best photos and videos. Your media will be temporarly stored on the cloud for 30 days and auto expire. You can turn off cloud media processing in settings anytime. Deleting photos or videos in your gallery will also delete them from the cloud.
It is not recommended to store non-Ray-Ban Meta glasses inside the charging case (including Ray-Ban Stories). This could result in damage to both the non-Ray-Ban Meta glasses as well as the charging case.
To see your conversations with the AI you can open the Meta View app and navigate to the "AI Tab". You can also see all your voice activity in the activity log, and download this data in DYI.
Charging your glasses
To charge your glasses, put them in the charging case and place it on the nose bridge inside the charging case*. This is the only way to charge the glasses. You'll know your glasses are charging when the case LED blinks after you've docked them and closed the case. You can also see a charging icon in the Meta View app.
*The first time you charge your glasses you need to remove the protective plastic tab from the metal charging connections on the case.
Charging your case
To charge your charging case, connect the case to a power adapter using a USB-C cable and plug it into the front of the charging case. This is the only way to charge the case. If you're having issues with charging the charging case, please see the Troubleshooting section.
Charging safety
For safety information on charging your Ray-Ban Meta Glasses collections please refer to the Warranty and Safety Guide.
You can fully charge the glasses in approximately 75 minutes in the charging case. You can quickly charge the glasses to 50% in 22 minutes in the charging case.
There are two ways to check the charge level of your glasses and case:
-
1. Use the case LED
Your charging case has an LED indicator on the front of the case, which shows charge status of the case or glasses. When you open the case without your glasses inside, the LED will show the charge level of your case. Green means that your case has over 80% charge and orange means you have less than 80% charge. If you see red blinking, this means your case is out of battery. When you open the case and your glasses are charging inside, the LED will show the charge level of your glasses. Red means the case is out of battery or your glasses are not charging, green means that your glasses are fully charged, and pulsing orange means your glasses are charging. If your case is plugged in, the LED will remain on. If your case is not plugged in, the LED indicator will show charge level for 8 seconds. -
2. Use the Meta View app
When your glasses are connected to the app, you’ll be able to see the charge status on the main screen at the top left. You can also see the charging status within Settings. To see the case charging level within the app, dock your glasses in the charging case.
Up to four hours with a single charge and up to 36 hours with a fully charged case. A fully charged case has up to 32 hours of charge. The number of hours varies according to how you’re using the features.
The camera automatically adjusts to your environment for consistently high quality photo and video captures.
The one on the left is not a camera, it is the capture LED. The capture LED is an external facing LED that signals to others when you're taking a photo or video. If you have additional privacy or data questions, please visit the Meta View Help Center.
The capture LED is an external facing LED that signals to others when you're taking a photo or video, or when your glasses are first turning on. If you have additional privacy or data questions, please visit the Meta View Help Center.
Use the touchpad on the right temple of your glasses to control playback and volume:
- - Tap once to pause / resume playback
- - Tap once to pause or play audio
- - Double tap to skip forward
- - Triple tap to skip back
- - Swipe forward to turn the volume up
- - Swipe back to turn the volume down
To adjust volume on your glasses, swipe forward on the touchpad to turn up volume and swipe back to turn down volume.
You can also adjust the volume of system sounds in the Meta View app. Some examples of system sounds include low-battery warning and a sound to indicate you're taking a photo.
To adjust the volume of system alerts:
- 1. From the Meta View app, go to Settings
- 2. Tap System Alerts
- 3. Tap System Sounds
Your glasses have two lights, an inward-facing notification LED and a front-facing capture LED, which lets people know you’re taking a photo or recording a video. You can choose to customise the brightness of your inward facing notification within Settings in your Meta View app. Options for notification LED brightness are Automatic, Low, Medium, and High. Automatic brightness uses the ambient light sensor to adjust the brightness based on your environment.
You can control your notification and system alert preferences from the Meta View app.
To view and manage your settings:
- - Launch the app
- - Go to settings
- - Tap System Alerts
- - Push Notifications are used for sending important information about your glasses to your phone's lock screen, like low storage warnings.
- - System Sounds lets you adjust the volume for system sounds, like the sound that plays when you take a photo. These sounds can't be turned off.
- 1. Enable Bluetooth on your phone and pair your glasses and phone via the Meta View app.
- 2. Tap the circular download button in the lower right hand corner of the app home screen, which shows how many captures are available for download.
- 3. For things that require a fast connection to download, like import and firmware updates, your glasses will temporarily connect to their internal Wi-Fi network. On iOS, accept the “Join Wi-Fi Network” request and the glasses will start to transfer the files to the app.
Once you’re in the Meta View app, select a photo or video and tap on the share icon. You’ll see different ways to share your captures or save them to your phone's camera roll or gallery. Limitations may apply depending on which app you're sharing to.
With the Meta View app you can add music to your videos when creating a Montage. When you create a Montage you can choose music tracks to add to your shareable Montage.
The power ON/OFF switch is located on the left inner arm of the glasses, near the hinge.
To turn ON: Slide the power switch towards the lens, the notification LED starts blinking white. The white LED will blink while your glasses turn on. When it turns solid green, you’re ready to continue.
To turn OFF: Slide the power switch all the way to the left, the notification LED starts blinking red to signal that the glasses have turned off.
There are two ways to take photos and videos with your Ray-Ban Meta Glasses:
-
1. One-touch control
To take a photo, press once the capture button. The white notification LED will blink and make a sound during the capture.
To record a video, press and hold the capture button to record a 30- or 60-second video. Press again to stop recording. The white notification LED will stay on while you're recording.
The default video length is 30 seconds, but it can be extended to 60 seconds in Meta View App settings. -
2. Hands-free voice command
When Voice is wake word enabled, you can use your voice to take a photo or video. Say "Hey Meta, take a photo" or "Hey Meta, take a video."
When you take a photo or video, the capture LED will activate to indicate to those around you that you may be recording.
To learn more, watch the Product Tour via the Meta View app within Settings.
The notification LED, located inside near the right temple, changes color to signal a change of status relating to power, the capture function, Assistant, and the call function.
Power
Power on: The notification LED blinks white for about 12 seconds, then turns green for a couple seconds to let you know your glasses are ready to use.
Wake: The notification LED briefly blinks white then green to let you know your glasses are ready to use.
Low battery: The notification LED blinks orange 4 times when your glasses have low battery.
Shutdown: The notification LED blinks red 4 times when your glasses are about to automatically shut down when battery runs out, they get too hot, or too cold.
Photo and Video Capture
Photos: Both the notification LED and the capture LED blink white once when you take a photo.
Videos: Both the notification LED and the capture LED turn solid white while you record video.
Capture errors: The notification LED turns solid orange for about 3 seconds if it runs into a problem that prevents you from taking captures.
Voice
The notification led will pulse white to let you know voice commands are turned on or wake word has been activated.
Calling
Incoming call: The notification LED blinks white.
Call connected: The notification LED pulses white while you're on a call.
You can opt-in to enable voice control in the settings of the Meta View app. To turn Voice on or off:
- 1. Open Meta View and go to setting
- 2. Tap Voice, then toggle next to Voice Control
When Voice is enabled, you can press and hold the touchpad to use it.
Voice features available in English, Italian and French. Select voice features available only in English.
You can use "Hey Meta" to capture photos and videos, make calls and send messages, control media and volume, and check battery status by saying:
Photo Capture
“Hey Meta, take a photo.”
“Hey Meta, take a picture.”
Video Capture
“Hey Meta, start a video."
“Hey Meta, start recording”
“Hey Meta, record a video now.”
"Hey Meta, take a video.”
“Hey Meta, end video.”
“Hey Meta, stop video.”
Calling and Messaging
“Hey Meta, call [contact name]."
“Hey Meta, call [contact name] on Messenger/Whatsapp.”
"Hey Meta, send a message to [contact name].”
“Hey Meta, send a message to [contact name] on Messenger/Whatsapp.”
Media and Volume Control
“Hey Meta, pause."
"Hey Meta, next.”
“Hey Meta, stop."
"Hey Meta, resume.”
“Hey Meta, volume up."
"Hey Meta, volume down.”
Battery status
“Hey Meta, battery status."
"Hey Meta, how much battery is left?”
Sharing from Glasses
"Hey Meta, take a picture and send it to [contact name]"
"Hey Meta, take a picture and send it to [contact name] on Messanger/Whatsapp/my phone"
Time & Date
"Hey Meta, what time is it?"
"Hey Meta, what's the date?"
Voice currently operates in English, French and Italian. But selected voice commands are only available in English.
You can use either Whatsapp or Messenger to send and receive messages. Once you’ve selected your default provider in the Meta View app the following voice commands will automatically activate your chosen method.
To send a message
“Hey Meta, send a message to [contact name]”.
To hear message notifications
In the app settings, under ""calling and messaging"", choose the service (Messenger, WhatsApp) and select ""announce messages”.
To hear message content in notifications
In the app settings, under ""calling and messaging"", choose the service (Messenger, WhatsApp) and select ""announce messages"" and ""read out messages”.
If you don’t want to send a message with your default provider, use the following command to activate the alternative method:
To send a message
“Hey Meta, send a message to [contact name] on Messenger/Whatsapp.”
Currently WhatsApp voice commands are only available in English, so to use this function your Meta View app language needs to be set to English.
You can use either Whatsapp or Messenger to make calls.
Once you’ve selected your default provider in the Meta View app the following voice commands will automatically activate your chosen method:
To make a call
“Hey Meta, call [contact name]”
If you don’t want to make a call with your default provider, use the following command to activate the alternative method:
To make a call
“Hey Meta, call [contact name] on Messenger/Whatsapp.”
Currently WhatsApp voice commands are only available in English, so to use this function your Meta View app language needs to be set to English.
You can start a live broadcast to connect with your followers in real time through your AI glasses. The feature is available on Facebook and Instagram.
First, make sure your glasses are on, have finished startup, and that you're wearing them.
Then:
- 1. On your phone, open Facebook or Instagram
- 2. Tap the plus button
- 3. Swipe to "Live"
- 4. After a few seconds you'll hear a sound, and a green widget in the app will show that your glasses are connected
- 5. On your glasses, double-press the capture buttton to switch between your phone and glasses cameras
- 6. Tap the button in the app to begin your live video
A Montage allows you to compile 3-10 individual video captures into one shareable movie with effects, title and original music. You can choose from a variety of templates and music tracks, and edit the title, clips and music.
There are a few ways to create a Montage in Meta View app:
- 1. Tap on one video or photo capture from the gallery, go to the 3-dot menu (upper right of the media screen) and tap the "Montage" button
- 2. In the gallery, navigate to the "Creations" tab, and click on the "+" button
- 3. Multi-select a list of video or photo captures from the gallery and then tap the "Montage" button in the bottom action bar. Once you’re in the Montage creation screen, follow these steps to complete a Montage: 1. Choose captures to add as clips 2. Tap “Next” at the bottom of the screen 3. Select a Template by tapping on the one you want to use. 4. Tap “Next” in top right corner 5. Edit the title, clips, music, aspect ratio, and duration 6. Tap “Save” in the top right corner. Your Montage will now be saved in your Gallery.
To pair your glasses, open the Meta View app and make sure you're logged in to your Meta account. If you already have glasses paired to the Meta View app, go to Settings and tap the "Add Device" button on the top right. Then:
- 1. Select either Ray-Ban Stories or Ray-Ban Meta Glasses and proceed until you reach bluetooth pairing (bluetooth permissions must be granted) stage.
- 2. Make sure your glasses are turned on and placed in the case.
- 3. Press and hold the pairing button on the back of the case for 5 or more seconds. Release when the case LED pulses a blue light.
- 4. Your glasses should automatically appear in the app when they're ready to pair.
The Meta View app supports up to 2 pairs of glasses, but only 1 can be Ray-Ban Stories. This means you can connect Ray-Ban Stories and Ray-Ban Meta Glasses or 2 pairs of Ray-Ban Meta Glasses.
To set up your first pair of glasses, follow the in-app guidance. To set up your second pair, use the "Add Device" link from the Settings tab.
To restart your glasses slide the “On/Off button” back (Switch Off) and then forward (Switch On). After your glasses wake up, they will be reconnected to the app within a few minutes. This action will not cause you to lose any on-glasses media or cause the glasses to unpair from the Meta View App.
If that does not correct the issue, then try force restarting.
To force restart your glasses:
- 1. Make sure your glasses are charged and turned on.
- 2. Press and hold the capture button at the same time as turning the power switch off (pull the switch back towards the back of the glasses) and then ON (push the switch forward towards the front of the glasses). Then release the capture button.
- 3. Wait for the LED to flash green before releasing the capture button.
- 4. It may take a few minutes for your glasses to re-establish a connection with the app.
If your glasses don't reconnect to the app within a few minutes, you may need to unpair the glasses from the Meta View app and from the list of bluetooth devices on your phone, and then repeat the pairing procedure.
Warning: This will delete all the captures on your glasses and require you to unpair/ repair your glasses through the app.
To factory reset your glasses:
- 1. Close the right temple arm.
- 2. Press the capture button 5 times until the user LED turns orange.
- 3. Press and hold the capture button until the user LED starts flashing.
- 4. Release the capture button and wait for the LED to cycle through white and then green before turning off to indicate factory reset is complete.
- 5. You'll then need to un-pair and re-pair your glasses with the Meta View app.
Your Ray-Ban Meta Glasses and charging case have a different charge lifecycle:
Charging Case
A fully charged case provides 8 additional frame charges. You can fully charge the case to 100% in 3.5 hours.
Glasses Battery
Fully charged glasses last up to 4 hours for moderate usage and up to 3 hours with continuous audio streaming and voice assistance. This may vary with use and other factors.
The glasses can capture and sync up to 100 videos or up to 500 photos per full charge.
You can fully charge the glasses to 100% in approximately 75 minutes in the charging case.
You can quickly charge the glasses to 50% in 22 minutes in the charging case.
When auto-import is enabled, Meta View will import media automatically while your glasses are turned on and in the charging case. Ensure that Bluetooth is enabled and your phone is connected to your saved Wi-Fi. If you are on Android 13+, Auto-import will be enabled by default.
If you are on other Android versions, enable auto-import by going go through the following actions:
- 1. Navigate to Settings > App Settings > Gallery and toggle on Auto-import media.
- 2. Provide the necessary location permissions when prompted.
- 3. Add the Wi-Fi network connected to the iPhone to the Wi-Fi list.
- 1. Navigate to Settings > App Settings > Gallery and toggle on Auto-import media.
- 2. Provide the necessary location permissions when prompted.
- 3. Add the Wi-Fi network connected to the iPhone to the Wi-Fi list.
Keep your phone close to you and in front of you, or in a front pocket. If you have a good 5G Wi-Fi signal, connect your phone to Wi-Fi, otherwise disable Wi-Fi on your phone and seek out a strong cell phone signal. Do not stream music from your phone or interact with other Bluetooth devices (such as watches) during a live video.
You can pair up to two pairs of AI glasses with the Meta View app. However, the app can only support one Ray-Ban Stories. So, possible multi-device configurations include: 1 Ray-Ban Stories and 1 Ray-Ban Meta Glasses or 2 Ray-Ban Meta Glasses. This is a great choice if you want a pair for indoors and outdoors, a pair of RX and non-RX, or you just want different styles for different days.
When you have two pairs of glasses paired with the Meta View app, you can loan a pair to a friend and capture media on both concurrently. But other functionality, such as: import, listen, live streaming, and calling/messaging can only work on one pair at a time. For the best experience, we recommend that if you're trying to use advanced features that you leave one pair in the case or turn one pair off completely.
If you have an accessibility request or an issue with an accessibility related feature, please submit a report in Meta View Settings via Help & Support.
Yes. However, some functions may be limited, and doing so may affect the quality of your live video.
When you're done co-hosting, restart your live video to fix any issues.
In the Meta View app, go to Calling & Messaging > Messenger, click on “Connect” and follow the instructions.
You can activate voice controls by saying “Hey Facebook” on Ray-Ban Stories, and “Hey Meta” on Ray-Ban Meta Glasses.
After activating voice controls, use one of the following commands to send a message on Messenger:
“Call [contact name] on Messenger”
“Call [contact name]”
You can answer a call using tap gestures on the right side arm of the glasses.
Double tap to answer the call. Tap and hold, to reject the call.
While in the call, double tap to hangup.
Activate voice controls by saying “Hey Meta” on Ray-Ban Meta Glasses, or “Hey Facebook” on Ray-Ban Stories, and say “answer call”. To reject the call say, “reject call”.
After activating voice controls, use one of the following commands to send a message on Messenger:
“Send a message to [contact name] on Messenger”
“Message [contact name] on Messenger”
“Message [contact name]”
“Message [cotnact name] I am running late”
You can reply to an incoming message from Messenger by activating voice controls and saying “reply” within 60 seconds of receiving the message. For example, “Hey Meta, reply”.
In the Meta View app, go to Calling & Messaging > Messenger and turn on:
Announce Messages to get notification of message sender name
Read out messages to get the message read out
After activating voice controls and connecting to your providers (Messenger, Whatsapp or your phone) in the Call and Messanging settings in the Meta View app. Use one of the following commands to take a new photo and send it on Messenger, WhatsApp or your phone.
“Send a photo to [contact name]”
“Take a picture and send to [contact name]”
You can add your preferred provider to your voice command by saying:
“Send a photo to [contact name] on Messenger/WhatsApp/myphone” (*)
Assistant will ask for confirmation before sending. All the photos you shared from your glasses will be available for import in Meta View app.
(*) Note that for iPhone's iMessage, you will still need to go to your phone to confirm sending.
To enable location for voice controls go to your phone settings, and check that location access is set to "always allow" for Meta View this will allow for you to ask location based real time questions like weather.
If your glasses aren’t turning on, try the following steps:
- 1. Make sure the glasses have the power switch turned on by pushing the switch towards the front of the frame. If you see a red dot next to the switch, that means the glasses are OFF.
- 2. Dock the glasses inside the charging case and charge for an hour. Make sure the charging pins on the case and glasses are clean. If the glasses are charging, the LED indicator on the case will show orange (take out ""pulsing""). If you don’t see a charging indicator, try charging the case from a different outlet, with a different cable, with a different charger or with a USB-C charging block.
- 3. If you’ve tried steps 1 to 2 and your glasses still don’t turn on after several hours of charging, you can request a replacement pair. Please refer to the FAQ HOW DO I OPEN A WARRANTY RETURN REQUEST for instructions on how to begin a replacement request.
Please note:
- • Your glasses and charging case should arrive partially charged.
- • Using the case is the only method to charge your glasses.
- • Software updates requires a minimum charge level that varies depending on temperature. The Meta View app shows a warning message if your glasses need more charge to proceed with an update.
Something went wrong while trying to make a call or send a message with my Ray-Ban Meta Glasses. What should I do?
When attempting to make a call or send a message, you may receive a message stating: “Something went wrong. Double-check that Messenger and Bluetooth are connected.”
If you see this message while trying to make a call or send a message on Messenger, try the following steps to fix the issue.
Update and log in to the Messenger app
- 1. Open Apple’s App Store and search for Messenger.
- 2. Tap Update to update the app.
- 3. If the app says Open that means the app is up to date.
- 4. Open Messenger and sign in.
Enable Bluetooth permissions for Messenger
- 1. Open the Settings app on your iPhone.
- 2. Tap Privacy then tap Bluetooth.
- 3. Find Messenger and turn the toggle on.
Disconnect then reconnect Messenger to Meta View
To disconnect Messenger:
- 1. Open Meta View app tap your profile picture in the top right.
- 2. Tap Calling and messaging then tap Messenger.
- 3. Tap Disconnect Messenger.
To reconnect Messenger:
- 1. From the Meta View and tap your profile picture in the top right.
- 2. Tap Calling and messaging then tap Connect Messenger.
If your glasses aren’t pairing with the Meta View app, try the following troubleshooting steps.
Make sure that:
- 1. Your glasses are charged and turned on: The power switch should be in the ON position. The white LED will blink while your glasses turn on. When it turns solid green, you’re ready to continue.
- 2. Bluetooth is enabled on your phone.
- 3. Your glasses are unpaired on your phone. If you are on iOS, go to your phone's bluetooth settings. Tap the info icon next to your glasses from the list of devices. Tap Forget This Device. This step isn't necessary on android devices.
- 4. The device is in pairing mode: Place the glasses inside the case then press and hold the button on the backside of the case for 5 seconds. The light blinks blue, indicating that the device is ready to pair. Your glasses will appear in the app when they're in pairing mode, which can take up to 10 seconds.
If your Ray-Ban Meta Glasses still don’t appear in the app, complete the following steps:
- 1. Slide the “On/Off button” first back (Switch Off) and then forward (Switch On)
- 2. Try quitting the Meta View app and reopening it.
When you say “Hey Meta” or "OK Meta", the notification LED will pulse white and an earcon will play to let you know the glasses are ready for your voice command. If you don't get a response to your voice command, check the following:
- - Make sure your glasses are on and the battery is charged.
- - Check that both Voice and "Hey Meta" are enabled in the settings of Meta View.
- - Make sure there's no background noise that may interfere with voice controls.
- - Make sure your phone is within Bluetooth distance of your glasses.
I left my charging case plugged in for a long time (e.g. overnight), and it's still not charged. Why?
While the majority of USB-C chargers should work with the charging case, there are some specific chargers that might not be compatible with the charging case. If you are using one of these incompatible chargers, you might see:
- 1. A consistent and persistent pulsing orange or green pattern on charging case LED
- 2. Missing charging icon in Meta View app.
If the case is still not charging, you can do a reset with the following actions:
- 1. Take glasses out of case
- 2. Press and hold the back button on case for at least 16 seconds, or until the LED begins flashing white.
- 3. Release the button and wait for the LED to stop flashing white.
- 4. Redock the glasses and plug in the case again to charge.
The Import button should be visible if the glasses are paired with the app, the glasses are on, the phone's Wi-FI and Bluetooth are on, and there are pending captures. If the Import button is not visible, try restarting the glasses (turn them off, then turn them on) and restarting the app. If this also doesn't solve the issue, try unpairing and re-pairing the glasses and make sure they are are not paired to another phone.
If "Hey Meta" or "OK Meta" is not responding consistently after setting up voice commands then:
- - Go into your glasses' Voice settings in the Meta View app and check that the Voice toggle is on
- - Go into "Hey Meta" preferences from the Voice settings and make sure that the "Hey Meta" toggle is on
- - You can also turn on the Wake sound toggle here if it is not already on.
- - Try saying "Hey Meta" or "OK Meta" again.
- - If the wake word was recognized, you should see the LED blink white in response. If the Wake sound toggle is on, you will also hear an earcon in response.
- - If that still doesn't work, try toggling off and then back on both the Voice and "Hey Meta" options, and try again.
- - If still not working, then another issue with voice commands is going on, likely that a microphone is blocked.
To troubleshoot a mic being blocked resulting in no earcon response from "Hey Meta" or "OK Meta":
- - Turn off toggle in Meta View app (TBD on where it will live/description)
- - Try "Hey Meta" or "OK Meta" again:
- - If working (Earcon response to Hey Meta or "OK Meta") then user should keep the toggle off
If call recipients are having trouble hearing you on calls (audio is broken/choppy/or extremely quiet) then:
- - Turn off toggle in Meta View
- - Try calling again:
- - If working (call back the recipient, if they can hear you better in same environment as before) then user should keep the toggle off
- - If still not working, then another issue with calling is going on, user should keep toggle turned on and try disconnecting/reconnecting your glasses
Here are some things you can try:
- 1. Move your phone closer to your glasses, and try again.
- 2. In your phone's Bluetooth settings, confirm that your Bluetooth is on and your glasses are connected.
- 3. Turn Bluetooth off and on again.
- 4. Close the Meta View app and then restart it.
- 5. Restart both your phone and glasses.
- 6. Unpair your glasses from the Meta View app, and then remove them from your phone's Bluetooth list of devices. Then, pair your glasses again.
In your phone's Bluetooth settings, make sure your glasses are connected for calls and audio.
Live videos from your glasses will be lower resolution than recorded videos from your glasses or phone.
You can improve resolution/video quality by ensuring that you:
- 1. Have a strong 5G Wi-Fi or cellphone signal.
- 2. Are close to your phone.
- 3. Keep your phone in a front pocket or in front of you.
- 4. Are disconnected from other Bluetooth devices.
If glasses do not properly fit the user, you may be having issues with wear detection. You can first try taking the glasses off then put them back on. If that does not work, try powering off the device and powering back on. Finally, if that does not succeed, you can disable wear detection in Settings > Your Glasses > Wear Detection. This will ensure the glasses are treated as "On" whenever powered on and hinges are open. Note: When Wear Detection is turned off, some features like auto-pause/auto-play music and Verified Sessions will be disabled.
Spotify Tap only works with users on Android OS 6.0 or higher and July 2023 security patch. Spotify app must be downloaded and logged in on your device. Please ensure your apps and system are updated to the most current version.
For Android troubleshooting:
- 1. Make sure that your app is open (or in the background) and logged in during your Spotify Tap session.
- 2. Confirm the Spotify app has "Permissions" set to "Nearby Devices" in Android Settings (Android 12 and above)
- 3. Confirm the Spotify app Battery setting in Android settings is set to "Unrestricted" and retry
If you are using a Free account then Spotify Taps will be limited, only Premium Spotify accounts will experience unlimited Spotify Tap.
Wet hair, helmets, hats, and other head accessories can occassionally be false-registering as taps on capacitive touch. If you commonly use your glasses in these situations, consider re-mapping the Tap & Hold gesture to 'none'. You can do this by going to Settings > Your Glasses > Gestures > Captouch. This will prevent your glasses from triggering new actions like Assistant Wake or Spotify Tap. If you hardclose media apps on your phone, single tap will no longer pause/play any media sessions.
You can cancel or exit any assistance function or inbound notification by doing a Tap & Hold gesture on the captouch sensor.
You can check whether your glasses are up to date or update them by going to Settings > Your glasses > Glasses update at any time.
You can check whether your glasses are up to date or update them by going to Settings > Your glasses > Glasses update at any time.
Video capture is a power heavy use case and for a small battery with less than 15% charge there is a significant brownout risk (voltage drop that could damage the battery). In order to protect the battery (from brownout) and make sure the users are able to record at least 60 second videos, Meta enforces certain minimum power thresholds. if the minimum power threshold is not met, then the users are blocked from recording videos. At room temperatures the threshold is 10% at 25°C and 15% at 20°C battery temperatures, however at lower temperatures the battery has higer brownout risk and thresholds are much higher.
To submit a bug on an issue you are seeing, go to Settings, Help & Support. Make sure 'shake phone to report a problem' is on. Then you can shake your mobile device back and forth to trigger our bug reporting feature. In the bug reporting form, please share details on the bug you are experiencing so our Help Center team can proactively assist you. Please also see our Help Center for possible solutions.
If you dock your glasses into the case and see either a solid red or pulsing red animation from the case LED - this signals that there is a charging error. Charging errors can occur if:
- 1. Glasses or case are too hot to charge.
- 2. Liquid detected on the glasses or case.
If glasses or case have liquid present, undock the glasses, clean / dry the nosebridge area, redock glasses into case. You may have to wait for glasses & case to fully dry to enable charging.
If your charging case is no longer responding to button presses or case open/close events, it could be either:
- 1. Your case has a dead battery and needs to charge
- 2. You interrupted a case update
If you may have interrupted a case update, dock the glasses again with the switch on. Case functionality should be recovered after the update completes.
Here are some things you can try if tapping the “Try again” button isn’t helping:
- 1. On your phone, close the Meta View app and reopen it.
- 2. Turn off your glasses, turn them on again, and wait until the green LED has turned off before trying again.
- 3. Turn off Bluetooth and Wi-Fi on your phone and turn them on again.
- 4. Restart your phone.
- 5. If you have already set up your glasses go into Settings > Glasses and privacy > Your glasses and unpair your glasses from the app and then remove them from your phone’s Bluetooth setting. Then try again.
- 6. Press and hold the capture button, then turn off your glasses, turn them on again, release the capture button.
Even when your glasses are not connected to the Meta View app you can capture photos and videos, check your glasses battery level if you enabled Voice controls, and listen to audio form a phone you are connected to over Bluetooth.
Here are some things you can try:
- 1. Move closer to your phone.
- 2. Keep your phone in front of you, or in a front pocket.
- 3. Disable Wi-Fi on your phone.
- 4. Turn off or disconnect other Bluetooth devices from your phone.
GEN 1:
GEN 2:
AI glasses are compatible with external power supplies rated: output 5V DC 2.5A (or higher).
Energy consumption related information required by the ecodesign regulation
- 1. Applicable test modes & power consumption:
- a. Off mode: (1) 0.04 W
- b. Standby mode: N/A since BT is pre-requisite for device setup
- c. Networked standby mode 1 (BT: On, Wifi: Off): (2) 0.35 W
- d. Networked standby mode 2 (BT: On, Wifi: On): (3) 0.57 W
- 2. Period after device enters networked standby: within 10 minutes after user inactivity.
- 3. After being fully charged, the equipment switches to off mode immediately.
GEN 2:
You can find below more details on the energy consumption related information required by the ecodesign regulation.
- 1. Applicable test modes & power consumption:
- Off mode: (1) 0.04 W
- Standby mode: N/A since BT is pre-requisite for device setup
- Networked standby mode 1 (BT: On, Wi-Fi: Off): (2) 0.25 W
- Networked standby mode 2 (BT: On, Wi-Fi: On): (3) 0.26 W
- 2. Period after device enters networked standby: within 10 minutes after user inactivity.
What are the key differences between Ray-Ban Meta (Gen 1) and (Gen 2), and how do the Blayzer Optics and Scriber Optics differ from the other models?
Ray-Ban Meta (Gen 2) features an upgraded camera with improved 3K Ultra HD video resolution and up to 8 hours of battery life on a single charge, 2x the battery life of Ray-Ban Meta (Gen 1).
Ray-Ban Meta Blayzer and Scriber Optics offer over 8 hours of battery life on a single charge and feature over-extension hinges, adjustable temple tips and interchangeable nose pads designed for prescription wearers. With a slimmer frame that looks and feels like regular glasses, they are designed for all-day comfort.
Transitions® lenses are sensitive to UV light, allowing them to seamlessly adjust color and tint in response to changing light conditions around you. Darkening in seconds, Transitions® lenses transform from clear or lightly tinted indoors to darkly tinted outdoors, providing optimal visibility and comfort in any environment so you can feel confident in your AI glasses all day long.
*Block 100% of UVA and UVB rays. Filter 26-51% of blue-violet light indoors and 78-93% outdoors. Blue-violet light measured from 400-455nm.
The eligible Rx range for Ray-Ban Meta glasses (Gen 2) is -6.00 to +6.00 total power.
The battery life for Ray-Ban Meta (Gen 2) glasses is up to 8 hours on a single charge, while Ray-Ban Meta Blayzer and Scriber Optics last over 8 hours on a single charge. All models include a charging case that provides an additional 48 hours of battery life.
RAY-BAN STORIES
Your Ray-Ban Meta glasses have a different charge lifecycle based on the generation.
1) Ray-Ban Meta:
Fully charged glasses last up to 4 hours for moderate usage and up to 3 hours with continuous audio streaming and voice assistance. This may vary with use and other factors.
2) Ray-Ban Meta gen 2:
Fully charged glasses last up to 8 hours for moderate usage and up to 5 hours with continuous audio streaming and voice assistance. This may vary with use and other factors.
Ray-Ban Meta gen 2 is an upgraded version of Ray-Ban Meta, offering improvements in video quality, battery life and smart features:
1) Better Video Quality
- - Ray-Ban Meta gen 2 captures at 2203 x 2938 (6.5MP) vs 1360 x 1880 (2.6MP) on Ray-Ban Meta.
2) Longer Battery Life
- - Ray-Ban Meta gen 2 has a battery life of 8 hours (vs 4 hours on Ray-Ban Meta).
- - Ray-Ban Meta gen 2 has 19 hours of standby (vs 12.5 hours on Ray-Ban Meta).
- - Ray-Ban Meta gen 2 has 5.3 hours of calling (vs 4h on Ray-Ban Meta) and 5 hours of music playback (vs 3.5h on Ray-Ban Meta).
3) Style & Product Range: same styles and fit options (Wayfarer Regular and Large sizes, Headliner high and low bridges, Skyler).
- - Ray-Ban Meta gen 2 adds visual differentiation: the inner temple shows "(gen 2)" marking
Ray-Ban Stories and the Facebook View app (required to upload your data to Facebook) are currently available and intended to be used only in the US, Canada, Italy, UK, Ireland, Australia.
In order to download Facebook View, an Apple/Android profile in one of the 6 launched countries is needed. Users from other countries won’t find the app and won’t be able to download it.
To operate Ray-Ban Stories you need to connect your glasses with a smart phone and the Facebook View App. Here’s the complete checklist:
- • Smart phone with a recently released operating system: Android 8.1 and above (with location services enabled) or iPhone 6S or above, running iOS 13 and above
- • Wireless internet access
- • USB-C charging plug (if charging from a power outlet and not directly from a USB point)
- • A valid Facebook account
- • Facebook View App (downloadable from your App store)(downloadable by scanning this QR code)

Your Ray-Ban Stories comes with the following accessories and user manuals:
- • Charging case
- • Type-C to Type-C USB charging cable
- • Soft glasses pouch
- • Quick Start Guide
- • Safety & Warranty Guide (also downloadable here)
Your glasses use Wi-Fi in 2 different ways:
- For normal use, the app connects to your Wi-Fi network.
- When importing captures or installing firmware updates, the app will connect directly to your glasses' temporary Wi-Fi network.
- 1. Download the Facebook View app from your app store and log in using your Facebook account.
- 2. Turn on the Bluetooth setting on your phone.
- 3a. Start by turning on your glasses. Slide the power switch to the right, then quickly release it. The notification LED blinks white while your glasses turn on, which can take up to a minute. When the notification LED turns solid green, you're ready to continue. (If you can’t complete this step, continue to 3b, otherwise move on to step 4)
- 3b. Your glasses should arrive partialy charged, however you may need to charge your glasses before moving on to step 4. Place them inside the charging case and connect the case to a power source.
- 4. Put your glasses into Bluetooth pairing mode. Slide and hold the power switch for 5 seconds and release when the light blinks blue. Your glasses will appear in the app when they're in pairing mode, which can take up to 10 seconds.
- 5. Turn on the Bluetooth setting on your phone.
- 6. Enjoy exploring your world in a new way with Ray-Ban Stories
For illustrated set up instructions, please refer to the Facebook View app.
You can download the Ray-Ban Stories companion app, Facebook View, from your app store. Download now
Please note:
- • The app is only available to download in supported countries.
- • Deleting the app will erase all photos, videos, and creations. We recommend saving them locally before deleting the app.

If you’ve paired your phone and glasses before, they should automatically pair again. To pair them for the first time, follow these set up instructions.
If your glasses aren't connecting to the app, follow the in-app suggestions or manually try the following actions:
- Forget Device in your phone’s Bluetooth menu and pair them again
- Close and relaunch the Facebook View app
- Download the latest version of the app from your app store
- Make sure your glasses are sufficiently charged
- Force restart the device (instructions available here)
Use the touchpad on the right-side temple of your glasses to control playback and volume:
- • Tap once to pause / resume playback
- • Tap once to pause or play audio
- • Double tap to skip forward
- • Triple tap to skip back
- • Swipe forward to turn the volume up
- • Swipe back to turn the volume down
When you close your glasses, audio streaming will pause. When you reopen the glasses, they will reconnect via Bluetooth.
To adjust volume on your glasses, swipe forward on the touchpad to turn up volume and swipe back to turn down volume. You can check how the volume sounds to people around you by removing your glasses while media is playing.
You can also adjust the volume of system sounds in the Facebook View app. Some examples of system sounds include low-battery warning and a sound to indicate you're taking a photo.
To adjust the volume of system alerts:
- From the Facebook View app, tap on your profile photo in the top right.
- Tap System Alerts.
- Tap System Sounds.
There are two ways to take photos and videos with your Ray-Ban Stories:
- One-touch control
- Hands-free voice command
To take a photo, press and hold the capture button. The white notification LED will blink and make a sound during the capture. To record a video, press the capture button once to record a 30-second video. Press again to stop recording. The white notification LED will stay on while you're recording.
When Facebook Assistant is wake word enabled, you can use your voice to take a photo or video. Say "Hey Facebook, take a photo" or "Hey Facebook, take a video."
When you take a photo or video, the capture LED will activate to indicate to those around you that you may be recording. To learn more, watch the Product Tour via the Facebook View app within Settings.
- Enable Bluetooth on your phone and pair your glasses and phone via the Facebook View app.
- Tap the circular download button in the lower right hand corner of the app home screen, which shows how many captures are available for download.
- For things that require a fast connection to download, like import and firmware updates, your glasses will temporarily connect to their internal Wi-F network. On iOS, accept the “Join Wi-Fi Network” request and the glasses will start to transfer the files to the app.
Your Ray-Ban Stories glasses and Charging Case have a different charge lifecycles:
- • Charging Case.
- • A fully charged case provides you with an additional 3 days of glasses use.
- • You can fully the charge case to 100% in 180 minutes. Glasses Battery.
- • Fully charged glasses last up to 6 hours for moderate usage and up to 3 hours with continuous audio streaming and Facebook Assistant. This may vary with use and other factors.
- • The glasses can capture and sync up to 50 videos or up to 200 photos per full charge.
- • You can fully charge the glasses to 100% in 70 minutes in the charging case.
- • You can quick charge the glasses to 50% in 30 minutes in the charging case.
Charging your glasses
To charge your glasses, put them in the charging case*. You'll know your glasses are charging when the case LED blinks after you've docked them and closed the case.
The case can recharge your glasses multiple times and we recommend storing your glasses in the case whenever you’re not using them.
*The first time you charge your glasses you need to remove the protective plastic tab from the metal charging connections on the case.
Charging your case
To charge your charging case, use the USB cable that came with your glasses to connect the case with a charger or port. To charge from a wall outlet, you'll need a USB-C plug, which is not included with your glasses.
Case LED Your charging case has an LED indicator on the front of the case, which shows charge status of the case or glasses.
When you open the case without your glasses inside, the LED will show the charge level of your case. Green means that your case has over 80% charge and orange means you have less than 80% charge. If you see red blinking, this means your case is out of battery.
When you open the case and your glasses are charging inside, the LED will show the charge level of your glasses. Red means the case is out of battery or your glasses are not charging, green means that your glasses are fully charged, and pulsing orange means your glasses are charging. If your case is plugged in, the LED will remain on. If your case is not plugged in, the LED indicator will show charge level for 8 seconds.
You can also see the charging status via the Facebook View app within Settings.
You’ll be able to see the battery status of your glasses via the Facebook View app within Settings. If the glasses are charging in the case, you’ll also see the battery status of your case.
Charging safety
For safety warning on charging your Ray-Ban Stories please refer to the Warranty and Safety Guide.
You can't change your Ray-Ban Stories lenses and attempting to do so will invalidate the warranty. At the time of purchase, you’re free to choose from a range of lens colours, lens treatments, and whether you’d like to add your prescription.
You can view the complete range of frame and lens combinations here.
At the moment, Facebook Assistant is only available in English. You can change between English (United States), English (United Kingdom), and English (Australia). To update your Assistant preferences, go to Settings – Facebook Assistant.
You can enable Facebook Assistant in the settings of the Facebook View app.
To turn Facebook Assistant on or off:
- Open Facebook View and tap your profile picture in the top right of the screen.
- Tap Facebook Assistant, then tap the toggle next to Facebook Assistant.
If your glasses aren’t pairing with the Facebook View app, try the following troubleshooting steps.
Make sure that:
- Your glasses are charged and turned on: Slide and hold the power switch towards the lens until the notification LED starts blinking white, then release it. The white LED will blink while your glasses turn on. When it turns solid green, you’re ready to continue.
- Bluetooth is enabled on your phone.
- Your glasses are unpaired on your phone. If you are on iOS, go to your phone's bluetooth settings. Tap the info icon next to your glasses from the list of devices. Tap Forget This Device. This step isn't necessary on Android devices.
- The device is in pairing mode: Slide and hold the power switch for 5 seconds and release when the light blinks blue. Your glasses will appear in the app when they're in pairing mode, which can take up to 10 seconds.
If Ray-Ban Stories still doesn’t appear in the app, complete the following steps:
- Turn your glasses off and back on again
- Try quitting the Facebook View app and reopening it.
If you’re still unable to pair to the app during setup, please contact customer care.
When you say “Hey Facebook,” the notification LED will pulse white to let you know Facebook Assistant is listening. If Assistant doesn't respond to your voice, check the following:
- - Make sure your glasses are on and the battery is charged.
- - Check that Assistant and "Hey Facebook" are enabled in the settings of Facebook View.
- - Make sure there’s no background noise that might be disrupting or interfering with Assistant.
Something went wrong while trying to make a call or send a message with my ray-ban stories. What should I do?
When attempting to make a call or send a message, you may receive a message stating: “Something went wrong. Double-check that Messenger and Bluetooth are connected.” If you see this message while trying to make a call or send a message on Messenger, try the following steps to fix the issue.
Update and log in to the Messenger app:
- 1. Open Apple’s App Store and search for Messenger
- 2. Tap Update to update the app.
- a. If the app says Open that means the app is up to date.
- 3. Open Messenger and sign in
Keep in mind, closing the Messenger app can interrupt hands-free calling and messaging.
Enable Bluetooth permissions for Messenger
- 4. Open the Settings app on your iPhone.
- 5. Tap Privacy then tap Bluetooth
- 6. Find Messenger and turn the toggle on.
Disconnect then reconnect Messenger to Facebook View
To disconnect Messenger:
- 7. Open Facebook View and tap your profile picture in the top right
- 8. Tap Calling and messaging then tap Messenger.
- 9. Tap Disconnect Messenger
To reconnect Messenger:
- 10. From Facebook View, tap your profile picture in the top right.
- 11. Tap Calling and messaging then tap Connect Messenger.
If you find that your glasses aren't responding, try the following troubleshooting steps.
Restart Glasses
- With your glasses on, slide and hold the power switch to the right for about 12 seconds until the notification LED starts blinking white.
- Release the power switch, then wait until the notification LED turns green.
Factory Reset
Warning: This will delete all the captures on your glasses.
- Make sure your glasses are on and ready, which means no blinking LED and they're not busy.
- Slide and hold the power switch to the right while you press and hold the capture button.
- When the LED turns orange, first release the capture button followed by the power switch.
If you’re glasses aren’t turning on, try the following steps:
- Dock the glasses inside the charging case and charge for an hour. Make sure the charging pins on the case and glasses are clean. If the glasses are charging, the LED indicator on the case will show pulsing orange. If you don’t see a charging indicator, try charging the case from a different outlet, with a different cable, with a different charger or with a USB-C charging block.
- Slide and hold the power switch for 5-10 seconds to check for the glasses notification LED indicator. The LED will blink white for about 12 seconds and will turn solid green when the glasses are ready to use.
- If you’ve tried steps 1 to 3 and your glasses still don’t turn on after several hours of charging, you can request a replacement pair. Please refer to FAQ HOW DO I OPEN A WARRANTY RETURN REQUEST for instructions on how to begin a replacement request.
Please note:
- • Your glasses and charging case should arrive partially charged.
- • Using the case is the only method to charge your glasses.
- • We recommended charging your glasses in the case whenever you’re not using them.
- • Software updates requires a minimum charge level that varies depending on temperature. The Facebook View app shows a warning message if your glasses need more charge to proceed with an update.
Whatever your question, contact our Ray-Ban Stories products specialists and they’ll be happy to help.
Before you get in touch, we recommend having your serial number, glasses version, app version and account details ready. You can find details about the app version or your account by going to Settings -> General. You can find details about your glasses, including serial number, software on your glassees, or model information by going to Settings -> Your Glasses.
For questions about Facebook Assistant or Facebook View privacy please refer to the Facebook help center.
You can find your Ray-Ban Stories Serial Number in two places:
- In the Facebook View app under: Settings - My Glasses - About
- Printed on the inside of the left temple of your glasses
The charging case has a separate Serial Number, located on the inside of the case.
You can view and download the Ray-Ban Stories manufacturer warranty policy here.
Returns are rare at Ray-Ban, but if you think your Ray-Ban Stories are defective and the return timeframe has expired you can open a warranty claim for a repair or replacement. To open a claim you’ll need your product serial number and proof of purchase. The warranty is only valid for 1 or 2 years from purchase, based on the country of purchase.
You can view and download the full warranty policy here.
Additional privacy or data information is provided at the Facebook View Help Center.
We’re sorry that you haven’t found the answer you’re looking for. You can find further information and contact details for our customer care via the Ray-Ban Help Center.
You can also visit the Facebook Help Center for more information on the Facebook View app.
Updating to Android 13 may cause the following issues when using Bluetooth with Ray-Ban Stories on some Android devices:
Bluetooth audio may stop working. Restarting your phone may fix this.
Some music controls may not work, such as tapping the touchpad or using Facebook Assistant to play, pause and skip forwards or back. You can still control music apps through your phone and listen with your Ray-Ban Stories.
Answering incoming phone calls by tapping the touchpad or using Facebook Assistant may not work. You can still answer calls on your phone and use Ray-Ban Stories to speak to the caller.
We're working on software updates to address these issues.
A Meta Account isn't a social media profile; it’s a new way to log in to the Facebook View app that gives you more control over the information you share and how you interact with Meta devices. From July 2023, you'll need a Meta account to use Facebook View and Ray-Ban Stories. Learn more at Meta.com
In July 2023, we're launching Meta accounts for Ray-Ban Stories users in all supported countries. You'll be notified about the Meta account launch and corresponding privacy policy update. You’re encouraged to install the latest version of the firmware and app software in preparation for the Meta accounts launch. Learn more at Meta.com
When you log in to Facebook View, you'll be directed through the steps to create a Meta account. You can also create one on your own here. You can use your existing Facebook or Instagram credentials or your email. When creating a Meta account, you’ll be asked for basic information such as name, email, phone number and birthday. Learn more at Meta.com
Is the Ray-Ban Stories experience different for users who add their Facebook and Instagram accounts to their Meta account?
The experience using Facebook View doesn't change if you add your Facebook or Instagram account to your Meta account. You can still access and use hands-free calling and Messaging via Messenger and WhatsApp or share photos and videos to Facebook or Instagram without adding these accounts to your Account Center. Learn more at Meta.com
If I’m an existing user and switched to a Meta account, how long do I have to import my photos and videos from my glasses to the View app?
Once you switch to a Meta account in the Facebook View app, you have 60 days to pair your glasses to complete the migration. If migration isn't completed within 60 days, you'll need to do a factory reset (which will result in a loss of any photos or videos stored on the glasses and not yet imported to the app).